Cleaning the engine bay
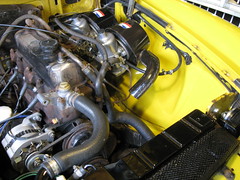
The engine bay had been saved - like much of the car - by a Waxoyl coating applied by a previous owner. Where the coating hadn't been applied the paint in the engine bay had rusted, I suspect largely due to the attention of the mice inhabitants. However now the car is getting constant attention I feel happy enough to remove the coating and reveal the pristine paintwork beneath. It will also make a huge difference to how the engine bay looks as the yellow paint really sets off the components well.
Under the car the Waxoyl coating is a really thick bobbly layer, but here in the engine bay it looks almost like a matt black paint (you can see it prior to removal here). Removing it requires either turps or petrol to be rubbed in using a semi-soft brush (a toothbrush or washing-up brush are ideal - you want to be sure you aren't damaging the paintwork) and then wiped off with a soft cloth. While petrol is more effective you do have the disadvantage of the fumes, so I'd recommend taking frequent breaks/wearing a mask if you go down this route.
So far we've done the carb-side of the bay - this is the easiest side. The other side has all the wiring and most of the piping which will all have to be disconnected and moved out of the way to give access to the paintwork.
Also in this shot you can see the newly repainted radiator cover. We'd rubbed this back to it's brass base and had considered leaving it all shiny, but the soldered pipework and steel end-caps made it a little untidy looking, so we put on a couple of coats of Very High temperature engine paint making it look like new.